How to Set Up a Caridina Shrimp Tank (HNshrimp Method)
Setting up a Caridina shrimp tank requires a stable, soft-water environment that supports beneficial bacteria and mimics the shrimp’s natural habitat. Below is the method used by HNshrimp—a proven process that has helped breed thousands of healthy Caridina shrimp.
What You’ll Need:
- Bacteria powder (e.g., x2 Shrimp brand) to seed the substrate
- Nitrifying bacteria (HNshrimp uses Seachem Stability)
- GH+ salt or Nutrafin Shrimp Mineral for remineralizing RO water
- Active substrate (e.g., ADA Amazonia) to buffer pH between 5.5–6.4
- Pure RO water (reverse osmosis) for complete control of water parameters
- Aquarium light and filter (sponge, hang-on-back, or canister)
- Air pump (if using a sponge filter)
- TDS meter to monitor water hardness
Step-by-Step Caridina Tank Setup
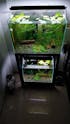
Day 1: Establish the Foundation
- Add Active Substrate: Use a pH-buffering soil like ADA Amazonia. Apply 1L per 30L of tank volume, or aim for a 2–3 cm thick layer if combining with plants.
- Sprinkle Bacteria Powder: Spread a thin layer to help jumpstart biological filtration and support early biofilm growth.
- Add Live Plants: You can plant at this stage or wait until Day 21 (optional).
- Fill Tank with RO Water: Always use pure RO water to control GH and TDS precisely.
- Add Nitrifying Bacteria: Dose according to product instructions, or slightly more to ensure a strong start.
- Start Filter: Use a pre-filter sponge on HOB or canister filters to prevent shrimp from being sucked in.
- Continue Nitrifying Doses: Add 1 cap of bacteria every other day for 15 days to support the nitrogen cycle.
Day 8: Light Activation
Turn on the aquarium light. This helps encourage the growth of biofilm and algae, which serve as natural food for baby Caridina shrimp.
Day 21: Final Prep for Livestock
- Observe Algae and Biofilm: A noticeable biofilm layer is normal and beneficial for shrimp.
- Drain 90% of the Water: This helps remove excess nutrients while retaining established bacteria in the substrate and filter.
- Optional: Add More Plants for aquascaping or additional cover.
- Refill with Fresh RO Water to restore tank volume.
- Remineralize: Use GH+ salt to bring TDS to 100–120 or GH between 4–5.
- Optional: Add Shrimp Supplements (e.g., SL-Aqua) for molting support and fertility.
- Test Water Parameters: If ammonia levels are near 0, your tank is safe for shrimp.
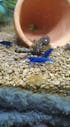
- Acclimate and Introduce Caridina Shrimp: Drip-acclimate over 1–2 hours to avoid shock. Then, release the shrimp into their new home and enjoy.
Conclusion
This method from HNshrimp ensures a stable and shrimp-safe aquarium from the start. By using active substrate, nitrifying bacteria, and RO water with controlled GH, you can create the ideal conditions for breeding and keeping vibrant, healthy Caridina shrimp. With patience and good care, your tank can thrive just like HNshrimp's successful setups.